
The installation process of an AC resonant test system for Capacitor Voltage Transformers (CVT) is a critical procedure that requires careful planning, technical expertise, and strict adherence to safety standards. As a leading supplier of AC Resonant Test Systems for CVT, I am well - versed in the intricacies of this installation process. In this blog, I will walk you through each step of the installation, ensuring that you have a comprehensive understanding of what it entails.


Preparation Phase
Before starting the installation, a thorough preparation phase is essential. This phase sets the foundation for a successful installation and helps avoid potential issues down the line.
Site Inspection
The first step is to conduct a detailed site inspection. The location where the AC resonant test system will be installed should be clean, dry, and free from any potential hazards. The floor should be level to ensure the stability of the equipment. Additionally, the site should have sufficient space to accommodate all the components of the test system, including the Variable Frequency Power Supply, resonant reactors, and control cabinets.
Equipment Inspection
Once the site is inspected, the next step is to inspect the equipment itself. Carefully examine all the components of the AC resonant test system for any signs of damage during transit. Check the electrical connections, cables, and insulation for integrity. Make sure that all the necessary accessories, such as grounding cables and test leads, are included and in good condition.
Documentation Review
Review all the technical documentation provided with the equipment. This includes the installation manual, operation manual, and safety instructions. Familiarize yourself with the specifications of the test system, the installation requirements, and the safety precautions. If there are any questions or uncertainties, contact our technical support team for clarification.
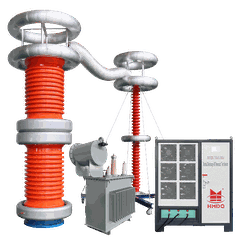
Installation of the Variable Frequency Power Supply
The variable frequency power supply is the heart of the AC resonant test system. It provides the adjustable frequency and voltage required for the resonant testing of CVTs.
Mounting
First, mount the variable frequency power supply in a suitable location within the test area. Ensure that it is securely fixed to prevent any movement during operation. The power supply should be placed in a well - ventilated area to dissipate heat effectively.
Electrical Connections
Connect the power supply to the main power source. Use the appropriate cables and connectors as specified in the installation manual. Make sure that the electrical connections are tight and secure to prevent any electrical arcing or short - circuits. Also, connect the control cables from the power supply to the control cabinet.
Installation of Resonant Reactors
Resonant reactors play a crucial role in achieving resonance in the test circuit. They are used to tune the test system to the desired frequency.
Placement
Place the resonant reactors in a proper arrangement according to the test requirements. The reactors should be spaced apart to allow for proper ventilation and to prevent overheating. They should also be positioned in a way that minimizes the length of the connecting cables.
Connection
Connect the resonant reactors in series or parallel, depending on the test voltage and current requirements. Use high - voltage cables with appropriate insulation ratings. Ensure that the connections are made correctly to avoid any impedance mismatches that could affect the resonance of the test system.
Installation of the Control Cabinet
The control cabinet is used to monitor and control the operation of the AC resonant test system.
Positioning
Position the control cabinet in a convenient location where the operator can easily access the controls and monitors. It should be placed at a suitable height for comfortable operation.
Wiring
Connect the control cabinet to the variable frequency power supply, resonant reactors, and other components of the test system. Follow the wiring diagram provided in the installation manual. Make sure that all the wiring is neatly organized and labeled for easy identification.
Grounding
Proper grounding is essential for the safety and reliable operation of the AC resonant test system.
Grounding Rod Installation
Install grounding rods in the ground near the test area. The grounding rods should be made of a conductive material, such as copper, and should be driven deep into the ground to ensure a low - resistance connection.
Grounding Connections
Connect all the components of the test system, including the variable frequency power supply, resonant reactors, and control cabinet, to the grounding system. Use grounding cables with sufficient cross - sectional area to carry the fault current safely.
System Testing and Commissioning
After the installation is complete, the next step is to conduct system testing and commissioning.
Visual Inspection
Before powering on the system, perform a final visual inspection to ensure that all the components are installed correctly and all the connections are secure.
Functional Testing
Power on the system and perform functional tests to verify the operation of each component. Check the variable frequency power supply for proper frequency and voltage adjustment. Test the resonant reactors for resonance at the desired frequency. Monitor the control cabinet for accurate display of test parameters.
CVT Testing
Once the system passes the functional tests, it is ready for CVT testing. Connect the CVT to the test system and perform the resonant test. Monitor the test results carefully to ensure that the CVT is functioning properly.
Safety Considerations
Throughout the installation process, safety should be the top priority.
Personal Protective Equipment (PPE)
All personnel involved in the installation should wear appropriate PPE, such as safety glasses, gloves, and insulated footwear.
Lockout/Tagout Procedures
Before performing any maintenance or installation work on the electrical components, follow the lockout/tagout procedures to isolate the power source and prevent accidental energization.
Safety Training
Ensure that all personnel involved in the installation are trained in the safe operation of the AC resonant test system. They should be familiar with the safety instructions and emergency procedures.
Conclusion
The installation process of an AC resonant test system for CVT is a complex but well - defined procedure. By following the steps outlined in this blog, you can ensure a successful installation and reliable operation of the test system. As a supplier of Vehicle - Mounted AC Resonant Tester and HV Cable AC Resonant Tester, we are committed to providing high - quality equipment and excellent technical support.
If you are interested in purchasing an AC resonant test system for CVT or have any questions about the installation process, please feel free to contact us for a detailed discussion and procurement negotiation. We look forward to serving you.
References
- Manufacturer's installation manual for AC resonant test system for CVT
- Electrical safety standards and regulations for high - voltage testing equipment