

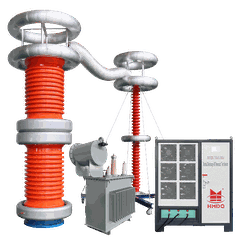


How to use the Inductive Resonant Test System for testing inductive impedance?
As a supplier of Inductive Resonant Test Systems, I am excited to share with you the ins and outs of using our cutting - edge testing equipment to measure inductive impedance. This guide will provide you with a comprehensive understanding of the process, from the basic principles to the practical steps involved.
Understanding the Basics of Inductive Resonant Testing
Before diving into the actual testing process, it's essential to understand the fundamental principles behind inductive resonant testing. Inductive impedance is a complex parameter that describes how an inductor opposes the flow of alternating current (AC). It consists of two components: resistance and inductive reactance. The inductive reactance is a function of the frequency of the AC signal and the inductance of the inductor.


The Inductive Resonant Test System operates on the principle of resonance. When an inductor and a capacitor are connected in a circuit, they can form a resonant circuit. At the resonant frequency, the inductive reactance and capacitive reactance cancel each other out, and the impedance of the circuit reaches a minimum. By measuring the current and voltage at the resonant frequency, we can accurately calculate the inductive impedance of the inductor under test.
Preparing for the Test
The first step in using the Inductive Resonant Test System for testing inductive impedance is preparation. Here are the key aspects to consider:
- Select the Appropriate Test System: Depending on the specific requirements of your test, you need to choose the right Inductive Resonant Test System. We offer a wide range of products, such as the HV AC Series Resonant Test Device, Integrated Container AC Resonant Test System, Variable Frequency AC Resonant Test System, 270kVA Variable Frequency Resonant Test System, and AC Variable Frequency Resonant Test System. Each system is designed to meet different testing needs, such as different voltage levels, power ratings, and frequency ranges.
- Check the Equipment: Before starting the test, carefully inspect the Inductive Resonant Test System and all the associated cables, connectors, and accessories. Make sure there are no visible damages, loose connections, or signs of wear and tear. Also, check the calibration status of the equipment to ensure accurate measurements.
- Prepare the Test Environment: The test environment should be clean, dry, and free from any sources of electromagnetic interference. Place the inductor under test in a stable position and ensure that it is properly grounded.
Connecting the Equipment
Once you have prepared the test environment and selected the appropriate test system, the next step is to connect the equipment. Here is a general procedure:
- Connect the Power Supply: Connect the power supply to the Inductive Resonant Test System. Make sure the power supply voltage and frequency match the requirements of the test system.
- Connect the Inductor Under Test: Use appropriate cables to connect the inductor under test to the test system. Ensure that the connections are secure and that the polarity is correct if applicable.
- Connect the Capacitor: Connect the capacitor to the test circuit to form the resonant circuit. The capacitance value should be selected based on the inductance of the inductor under test and the desired resonant frequency.
- Connect the Measurement Instruments: Connect the voltage and current measurement instruments to the test circuit. These instruments are used to measure the voltage across the inductor and the current flowing through it.
Conducting the Test
After connecting the equipment, you are ready to conduct the test. Here are the steps:
- Set the Test Parameters: Use the control panel of the Inductive Resonant Test System to set the test parameters, such as the frequency range, the voltage level, and the current limit. The frequency range should be set to cover the expected resonant frequency of the test circuit.
- Start the Test: Once the test parameters are set, start the test system. The test system will automatically sweep through the frequency range to find the resonant frequency. At the resonant frequency, the current in the circuit will reach a maximum, and the voltage across the inductor and capacitor will be in a specific relationship.
- Record the Measurements: At the resonant frequency, record the values of the voltage across the inductor and the current flowing through it. These values are used to calculate the inductive impedance of the inductor under test.
- Repeat the Test: To ensure the accuracy of the measurements, repeat the test several times and take the average of the results.
Calculating the Inductive Impedance
After obtaining the voltage and current measurements at the resonant frequency, you can calculate the inductive impedance using Ohm's law. The formula for calculating the impedance (Z) is (Z = \frac{V}{I}), where (V) is the voltage across the inductor and (I) is the current flowing through it.
It's important to note that the calculated impedance is the total impedance of the inductor, which includes both the resistance and the inductive reactance. To separate the resistance component, you may need to use additional measurement techniques or perform further calculations based on the characteristics of the inductor and the test circuit.
Analyzing the Results
Once you have calculated the inductive impedance, you need to analyze the results. Compare the measured impedance with the expected value or the specification of the inductor. If the measured impedance deviates significantly from the expected value, it may indicate a problem with the inductor, such as a short - circuit, an open - circuit, or a change in the inductance value due to factors like temperature, magnetic field interference, or mechanical stress.
In addition, you can also analyze the frequency response of the inductor by plotting the impedance as a function of frequency. This can provide valuable information about the performance and characteristics of the inductor, such as its resonant frequency, bandwidth, and damping factor.
Post - Test Procedures
After completing the test, there are several post - test procedures that you should follow:
- Shut Down the Equipment: Turn off the Inductive Resonant Test System and disconnect the power supply. Also, disconnect all the cables and connectors from the inductor under test and the test equipment.
- Store the Equipment Properly: Clean the test equipment and store it in a dry and safe place. Make sure to follow the manufacturer's instructions for storage and maintenance.
- Document the Test Results: Record all the test results, including the measured impedance values, the test parameters, and any observations or comments. This documentation can be used for future reference, quality control, and troubleshooting purposes.
Conclusion and Contact for Purchase
In conclusion, using the Inductive Resonant Test System for testing inductive impedance is a reliable and accurate method. Our range of Inductive Resonant Test Systems, including the HV AC Series Resonant Test Device, Integrated Container AC Resonant Test System, Variable Frequency AC Resonant Test System, 270kVA Variable Frequency Resonant Test System, and AC Variable Frequency Resonant Test System, are designed to provide high - quality testing solutions for various applications.
If you are interested in purchasing our Inductive Resonant Test Systems or have any questions about the testing process, please feel free to contact us. We are committed to providing excellent products and services to meet your needs.
References
- Electrical Engineering Handbook, Third Edition, edited by Richard C. Dorf.
- Power System Testing and Diagnosis by S. K. Bhattacharya.
- High - Voltage Engineering and Testing by E. Kuffel, W. S. Zaengl, and J. Kuffel.


