

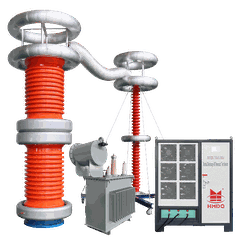



Ensuring the proper grounding of a VLF (Very Low Frequency) hipot tester is crucial for both the safety of the operators and the accuracy of the testing results. As a VLF hipot tester supplier, I've seen firsthand how improper grounding can lead to a whole host of problems. In this blog, I'll share some tips on how to make sure your VLF hipot tester is grounded correctly.
Why Proper Grounding Matters
First off, let's talk about why grounding is such a big deal. A VLF hipot tester is used to perform high - voltage tests on electrical equipment. These tests can generate significant electrical currents, and if the tester isn't grounded properly, it can pose a serious safety risk to anyone nearby. Electric shock is a real danger, and in the worst - case scenario, it can be fatal.
Proper grounding also helps to ensure the accuracy of the test results. When the tester is grounded correctly, it provides a stable reference point for the electrical measurements. Without a good ground, the readings can be affected by stray electrical currents and interference, leading to inaccurate results. This can be a major problem, especially when you're trying to determine the integrity of an electrical system.
Understanding the Grounding System
Before you can properly ground your VLF hipot tester, you need to understand the grounding system. A typical grounding system consists of a grounding electrode, which is usually a metal rod driven into the ground, and a grounding conductor, which connects the tester to the electrode.
The grounding electrode needs to have a low resistance to the earth. The resistance of the grounding electrode can be affected by factors such as the type of soil, the moisture content of the soil, and the depth of the electrode. In general, the lower the resistance, the better the grounding. You can use a grounding resistance tester to measure the resistance of the grounding electrode.
The grounding conductor should be a low - impedance cable that can carry the electrical current safely from the tester to the grounding electrode. It should be made of a good conductor, such as copper, and should be large enough to handle the maximum current that the tester can generate.
Steps to Ensure Proper Grounding
1. Select the Right Location for the Grounding Electrode
The first step is to choose the right location for the grounding electrode. You want to find an area where the soil is moist and has a low resistance. Avoid areas with rocky soil or areas that are prone to drying out. A good place to start is near a water source, such as a garden hose or a drainage area.
Once you've found a suitable location, drive the grounding electrode into the ground. The electrode should be at least 8 feet deep for optimal grounding. You may need to use a sledgehammer or a post - hole digger to get the electrode into the ground.


2. Check the Grounding Resistance
After you've installed the grounding electrode, use a grounding resistance tester to measure the resistance. The resistance should be less than 25 ohms for most applications. If the resistance is higher than 25 ohms, you may need to add more grounding electrodes or use a grounding enhancement compound to lower the resistance.
3. Connect the Grounding Conductor
Next, connect the grounding conductor to the VLF hipot tester and the grounding electrode. Make sure the connections are tight and secure. You can use a cable clamp or a grounding lug to make the connection. The grounding conductor should be as short as possible to minimize the resistance.
4. Inspect the Grounding System Regularly
Once the grounding system is installed, it's important to inspect it regularly. Check for any signs of damage or corrosion on the grounding electrode and the grounding conductor. Make sure the connections are still tight and secure. If you notice any problems, repair or replace the damaged components immediately.
Using Our VLF Hipot Testers
At our company, we offer a range of high - quality VLF hipot testers, including the 50kV VLF Hipot Tester and the VLF Hipot Tester with Tan Delta Measurement. These testers are designed to be easy to use and come with detailed instructions on how to properly ground the equipment.
Our testers are built with safety in mind, and proper grounding is an essential part of that safety. By following the steps outlined above, you can ensure that your VLF hipot tester is grounded correctly, providing accurate results and keeping you and your team safe.
Troubleshooting Grounding Problems
If you're having problems with the grounding of your VLF hipot tester, there are a few things you can do. First, check the connections. Make sure the grounding conductor is properly connected to the tester and the grounding electrode. Loose connections can cause high resistance and lead to grounding problems.
If the connections are okay, check the grounding resistance. If the resistance is too high, you may need to add more grounding electrodes or use a grounding enhancement compound. You can also try wetting the soil around the grounding electrode to lower the resistance.
If you're still having problems, it may be a good idea to consult a professional electrician. An electrician can help you diagnose and fix the grounding problem, ensuring that your VLF hipot tester is safe and operating correctly.
Conclusion
Ensuring the proper grounding of your VLF hipot tester is essential for safety and accuracy. By understanding the grounding system, following the steps outlined above, and using our high - quality VLF hipot testers, you can minimize the risk of electrical shock and get accurate test results.
If you're in the market for a VLF hipot tester or have any questions about grounding, feel free to reach out to us. We're here to help you make the right choice and ensure that your electrical testing is done safely and accurately. Let's start a conversation about your needs and see how we can assist you in your electrical testing endeavors.
References
- Electrical Safety Standards: IEEE Std 142-2007 (Green Book)
- High - Voltage Testing Manuals: Manufacturer's documentation for VLF hipot testers.


